For my Shard Rain Cam to work I need to have a reliable piece of software to take a picture even n minutes. I also need this software to live on a small, stable low power (as in Watts) computer.
Hardware:
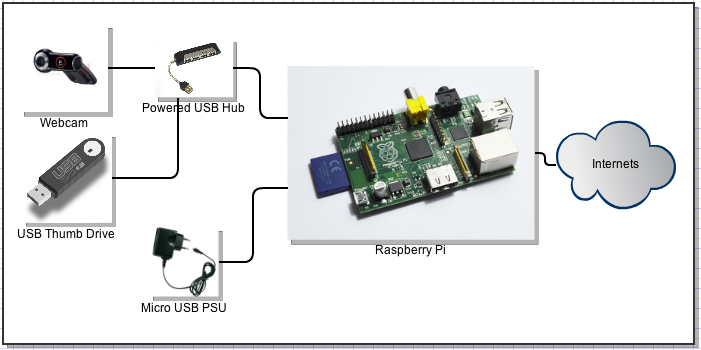
I’ve already discussed how the webcam has been made weather proof. Now we need to move on to the installation and setup of the raspberrypi. Below is the conceptual layout of the whole thing:
 I’m not going to show you a photo of what it actually looks like, as its not very pretty at all.
Its fairly well documented that the Pi and USB hubs don’t really play that well together. This largley to do with the hub not being able to supply enough current at peak demand. That’s certainly my experience. To avoid this I use a Nokia PSU to power the Pi and the powered hub to supply juice to the drive and camera.
Basic Linux Setup:
Step 1: Format the USB Thumb drive
We need a thumb drive to store all the images on, we need it to always be mounted in a known place. Why not just write the images to SD card? You can, however there are many good reasons not to. I’ve chosen to mount mine in a directory called:
/disk
I’ve also chosen to format my USB stick with ext4, which means that Windows and OSX won’t read it without extra drivers(or a format). If you choose to reformat your thumb drive, you’ll loose all the information on it To format your USB stick simply:
sudo bash
mkfs.ext4 /dev/sda1
mkdir /disk
chmod a+rwx /disk
The sudo command logs you in as root. This is important as most of the things we will be doing will require root privileges. Doing things as root, or using sudo can cause things to break, so be careful. The mkfs command will spit out a lot of text and will take a while. Its going through the entire drive and reallocating things. Next we make a directory for the newly formatted drive to live in, I’m going to call it /disk, you of course can choose any name, its just a directory.
Step Two: Make the drive mount automatically
Depending on how your version of linux works, when you plug in a drive it might pop up in /media/*some random name*. It might move about, it might not. To avoid this we are going to edit:
/etc/fstab
by default it will look something like this:
proc            /proc           proc    defaults                0       0
/dev/mmcblk0p1  /boot           vfat    defaults                0       0
/dev/mmcblk0p2  /               ext4    defaults,noatime        0       0
# a swapfile is not a swap partition, so no using swapon|off from here on, use  dphys-swapfile swap[on|off]  for t
hat
we need to add our thumb drive in there, so open /etc/fstab with your favorite editor (be sure to be running it as root, or through the sudo command) and add the following line:
proc            /proc           proc    defaults                0       0
/dev/mmcblk0p1  /boot           vfat    defaults                0       0
/dev/mmcblk0p2  /               ext4    defaults,noatime        0       0
/dev/sda1       /disk           ext4    rw,user_xattr,noatime   0       0
# a swapfile is not a swap partition, so no using swapon|off from here on, use  dphys-swapfile swap[on|off]  for t
hat
- /dev/sda is the location of your drive, the 1 refers to the partition number, most thumbdrives only have one, so its a fairly safe guess. (if you put a second drive in it should appear as /dev/sdb1)
- /disk is the folder where you want the driver to be mounted
- ext4 is the format of the disk
- rw,user_xattr,noatime RW means that you can read and write to the disk, the rest are out of the scope of this document
- 0 0 is also a bit irrelevant to this page
You should now be able to:
mount /disk
if you get an error message about permissions then retry it as root.
Step Three: install motion
Motion is an awesome bit of software that allows you to turn cheap USB webcams into a motion activated CCTV system. It comes with an inbuilt web server so you can watch your cameras in real time. The killer feature I’m looking for though is the time lapse function. So, to install:
sudo bash
apt-get update
apt-get upgrade
apt-get install motion
Step Four: Turn on SSH and disable X with raspi-config
We need all the memory we can get, so turning off the graphical login should save us a few megs. We will want to control the Pi remotely so we need to turn on SSH. We aren’t going to be using the GPU much so we can turn the memory assigned to it down with the same tool:
sudo raspi-config
and follow the instructions in the menu
Step Five: making motion work
I want motion to start at boot:
echo 'start_motion_daemon=yes' > /etc/default/motion
which allow it to start. Then we need to edit the main config file:
/etc/motion/motion.conf
here is a list of things that you might like to change:
# Start in daemon (background) mode and release terminal (default: off)
daemon on
# Image width (pixels). Valid range: Camera dependent, default: 352
width 640
#width 1280 #it starts to stutter at this resolution
# Image height (pixels). Valid range: Camera dependent, default: 288
height 480
#height 720 #same here
# The quality (in percent) to be used by the jpeg compression (default: 75)
quality 75
#this seems to be the only one that really works
ffmpeg_video_codec msmpeg4
# Target base directory for pictures and films
# Recommended to use absolute path. (Default: current working directory)
target_dir /disk
#snapshot name
snapshot_filename timelapse/tl_frame-%Y%m%d%H%M%S
# The mini-http server listens to this port for requests (default: 0 = disabled)
webcam_port 8081

# Quality of the jpeg (in percent) images produced (default: 50)
webcam_quality 50

# Output frames at 1 fps when no motion is detected and increase to the
# rate given by webcam_maxrate when motion is detected (default: off)
webcam_motion on

# Maximum framerate for webcam streams (default: 1)
webcam_maxrate 5

# Restrict webcam connections to localhost only (default: on)
webcam_localhost off

# Make automated snapshot every N seconds (default: 0 = disabled)
#This is the important one for us
snapshot_interval 120
save your config file and restart motion buy typing:
sudo bash
/etc/init.d/motion restart
You can then see whats going on by typing http://<your raspberrypi’s name>:8081
5 replies on “Shard Rain Cam – Timelapse Software”
Love it. I’m a noob so all learning is good.
Do you have any plans to capture the video from the cam? I got motion running on mine but am struggling with ffmpeg. This is my first exposure to linux so big learning curve.
thanks!
What errors are you getting? did ffmpeg get installed when you installed motion? Do you have the correct permissions to write to the output directory?
It can be a bit of a fussy thing ffmpeg!
I’d be interested to know which powered hub you used with your Pi
Hi Robin, I use this hub: http://www.trust.com/products/product.aspx?artnr=13474 It seems nice, has lots of power. Although I am abusing it by running a higher than spec voltage through it. Its at the end of a line run of cat6 cable, so there is quite a lot of voltage droop.